Tuesday, May 7, 2013

Another Faux Fur Bear Hide!

I cranked out another faux fur bear hide, with another soon to follow.  This one is for sale on etsy.


This is what the head looks like flattened:  


Schnauzer Commission

I recently made a custom faux fur animal hide for this handsome Miniature Schnauzer named Gonzo and his owner.  It was really fun (and funny) to make, with those huge eyebrows and mustache-beard combo.


My own schnauzer-mix snoozing on the faux fur schnauzer.  At first, I tried using white faux fur that I could find locally for the eyebrows and mustache, but it looked really weird, so I ordered a small amount of this amazing, long white faux fur.


Monday, April 22, 2013

Roof Greenhouse

I actually first learned about using hydroponics (growing without soil) to grow vegetables in Disneyland, of all places.  I went to Disney for my mom's birthday last year, and we managed to find this poorly-advertised tour of Disney's Epcot's gigantic greenhouse and insane hydroponics, aquaponics, and aeroponics systems (they really have all of the 'ponics covered).  Many of the restaurants in Epcot get their vegetables from these systems. One of Disney's gardening interns gave the tour, which lasted close to two hours.  It was by far the most interesting part of Disney World for me.  It totally blew my mind.  It just made so much sense: plants put less energy into their root system because all of the necessary nutrients are delivered straight to their roots (in soil, roots have to grow all over the place in search of nutrients); and therefore, they put more energy into producing fruit.  Not to mention the great space saving benefits of hydroponics and how much lighter it is than wet dirt, which is important when gardening on the roof.

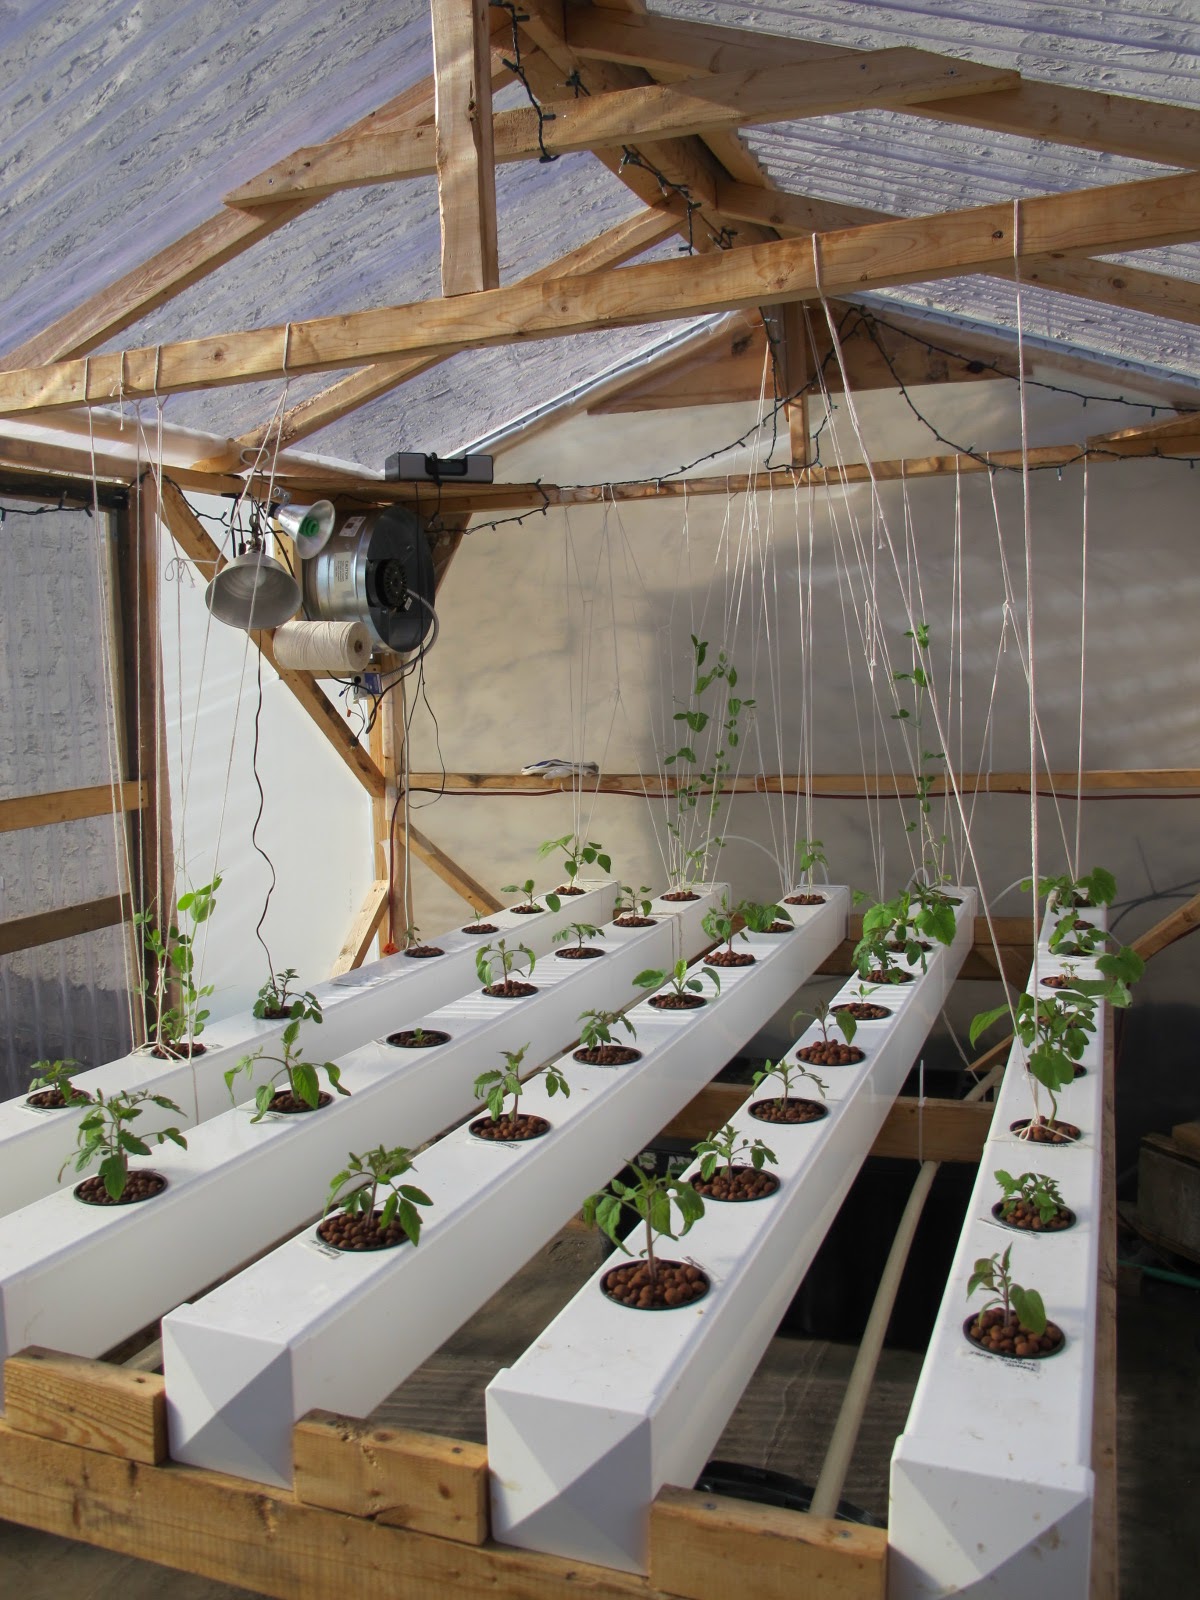
So early last summer, at the peak of my hydroponics obsession, I built this greenhouse and hydroponics system (with some help).  I decided to go with a Nutrient Film Technique system.
I built it out of vinyl fence post covers, cpvc pipe (pvc pipe isn't UV resistant!), brass fixtures, black rubber tubing, and a giant 54 gallon storage container for a reservoir. I started it seriously a week before I had to leave for Poland for three months so it wasn't completely finished before I left (but it was real close!) so all of my seedlings ended up just roasting on the roof.  When I got back, I planted leafy greens and they grew until mid January in the greenhouse.  At the end of the winter, the plastic I used started to disintegrate because it wasn't UV resistant and was the best I could get from Home Depot.  This season, I replaced all the plastic with appropriate greenhouse polyfilm, installed aluminum wire lock base to secure the plastic (the stuff the real greenhouses use), bought a new sturdier reservoir container, and JB installed the vent fan with thermostat.  I've got a lottt of vegetables growing now, both in soil and in hydroponics and I think it'll be cool to compare them.


Mason actually loves going on the roof, even though he's really scared of heights and has to be carried up and down a sketchy ladder.

The new vent fan and shutter.


JB rigged the door with this really neat pully system.  The counterweight is a chunk of an old pipe that was in our basement and used to be a still-working corroded leaky pipe in our house.

This is the ladder you have to climb to get onto the roof.

Here are some photos of the beginning of the summer last year:


I learned a valuable life lesson from building this greenhouse:  Do it the right way(which usually means the more expensive way) the first time and you will save yourself a lot of time and money in the long run... or even the pretty short run actually.

Bear Faux Fur

Started cutting up this new, really nice brown faux fur.  When I bought it, the woman who rung me up said something about how she hopes I'm making some kind of bear out of this.  I guess I made the right faux fur choice, since I'm making two bear hides out of it!

Monday, April 15, 2013

New etsy business cards and dirty fingernails

I used GotPrint.com to make these even though there are other great (sometimes free) options (Vistaprint.com, Moo.com) pretty much because you can request a free samples kit which has all the gloss/matte finishes, different thicknesses, coatings, etc.  I really really liked that I could hold little 2.5" x 3" pieces of paper in my hand before I ordered.  They only give you an online/emailed proof though, which really scared me because my monitor and my boyfriend's monitor look radically different, so I wasn't sure if the image was going to print totally blown out or not (it didn't, so my monitor isn't as off as I thought!), but it turned out fine.


Now I just need to work on designing a fine art business card (and I'm thinking rounded corners!)...

Sunday, April 14, 2013

Oregon Trail Sourdough Bread

I've been baking some bread lately!  It's not art but it still is making.  At first I only ever made no-knead bread because it was so easy and tasted great, but now I almost exclusively make sourdough bread with this recipe.  I tried making my own sourdough starter with no sour success.  I searched the internet for a sourdough starter and found this gem (and for free!) - Carl Griffith's 1847 Oregon Trail Sourdough Starter.  It is REAL SOUR.  And you can see Carl's original brochure here.  I made three loaves to give as gifts over Easter, and it's the first time I even ever thought to take pictures of them.  I guess if I had Instagram this would've happened quite a while ago...

Rising.

Double dutch oven.


Crusty close-up.


Friday, April 12, 2013

flea market embroidery


I got this awesome embroidery at a flea market a few weeks ago and I still think it's the coolest thing ever.  Just look at the way that mesh/lack of mesh is making light bust through those thread trees!  And it's got a real nice frame!  It's a pretty decent size - a little over two feet in each direction.  Definitely worth $5.

Thursday, March 28, 2013

2013 Mural Arts Paid Summer Internship Program

I recently applied to the Philadelphia Mural Arts Program's Paid Summer Internship.  I had to write an essay (one of my least favorite things to do) for the application.  When I was doing research for this essay, I snooped around a lot on the Mural Arts website and Mural Farm.  Philly Painting was something that I was totally unaware of until I had to write this essay.  It totally blew me away.  I watched all of the short videos about the project that were posted and a really great Ted Talk about it. These two Dutch guys named Hass and Hahn got a grant to paint like four entire blocks of Germantown Ave. They are known for painting a hillside of favelas (slums) in Rio de Janeiro bright colors. I really like these guys - they do amazing work and don't think too hard.

The following weekend JB and I were driving somewhere and we made sure to go down Germantown Ave to get there just so we could see it in the flesh.  It's awesome! There's also a lot of weird sculptures and a crazy mosaic fence.  So anyways, I painted my application to look like one of the Philly Painting color swatches, in the hopes that that would increase my odds.  Man, I really love Philadelphia's murals, public art, big stuff, and painting large scale... I really hope I get this internship!


Another thing I saw on the Mural Arts website was the zoo mural that's in progress now.  I remember a couple of years ago when they were accepting submissions for that mural, and I couldn't do it because I was going to be in Poland when all of the important planning meetings would have been happening.  All I can say is, I wish I would've applied anyways!  I am unimpressed by the design of this mural.  I feel like everything looks disjointed with how the scale shifts so much.  I feel like the artist was successful in the shifting scale of the kangaroos, because it feels like one of them is in the foreground.  In defense of this design, it is on the side of a parking garage, so I feel like designing anything would be really difficult with those grey strips breaking everything up.


Gallery at Memphis


I currently have four pieces in a show at the Memphis Street Academy Charter School.  The building itself is probably just as impressive as the show (look at that marble!). The show's opening had a great turn out and I was very impressed with all of the art.

Wednesday, March 27, 2013

Blueprint Magazine

Well, it appears my faux fur animal hides are going to be featured in the Style Buyer's Guide section of the 2013 Summer issue of The Blueprint Magazine!  I've been informed that this issue has Justin Timberlake on the cover and will also have the cast of HBO's Girls featured in it.  This is like a real magazine that you can buy at Barnes and Noble and... the airport!  I really can't even believe it.  I better get crackin' and make a ton more skins before the issue comes out in May!


So basically my faux fur skins will replace those sneakers!  


a couple of sketches from my upholstery class


Tuesday, March 26, 2013

My freshly reupholstered child-sized recliner/ONE VERY LARGE DOG

So my 10 week long upholstery class with John Price at the Portside Arts Center is finally over!  And I walked out of that class with a mighy-fine looking child-sized recliner........... but I learned a lot!  Some of the most important things I learned were:
  • All chairs, even the nicest, oldest antiques, are made incredibly poorly underneath the upholstery.  Things that should be symmetrical are not, there's probably a whole lot of wood putty holding it together, it's probably not made out of hardwood, sometimes the whole thing is held together only by staples, and even worse - sometimes cardboard is a really important part of the chair's underlying structure (like in mine... haha).  
  • Removing tacks and staples from the frame of the chair is definitely the most time consuming, labor intensive part of upholstery.
  • There's a kind of spray adhesive specifically for foam that works great and is just as good for your health as Super 77.  It's called Clearco 444.
  • The books about upholstery are that I own (bought them off Amazon a couple of years ago) are pretty outdated.  No modern upholsters still weave webbing, they just use this synthetic burlap called Sagless instead.  It's a lot less work and much less time consuming.
  • I learned about and got to use a lot of cool upholstery-specific tools: button covering machine and this weird thing that tacks down springs called a "clinch it".
  • I learned about a couple of awesome websites from some of the other students in the class: Spoonflower (you can make your own custom fabric designs and get them printed, or buy from a huge amount of pre-made real-unique fabrics) and Van Dyke's Restorers (they sell nice hardware and a ton of replica parts)
  • I now will be able to identify very very odd looking old upholstery tools at flea markets, and probably be able to get them for real cheap because nobody else will know what the hell they do.
  • Pneumatic staple guns are so much more superior than hand held ones.
  • I got more acquainted with my industrial sewing machine, as I sewed the arms at home
  • I now know where to buy large and small quantities of upholstery fabric, sprints, cotton, foam, etc in Philadelphia (Quaker and Katz, respectively).
  • It is possible to staple your finger (I didn't, but I saw it with happen to someone else with my own two eyes).


Of course I forgot to take a before picture... and process shots... but in the second to last photo you can see what the front of the back of the chair used to look like.  You can also see the fabric I used in better lighting.  I personally feel it looks MUCH better tufted and covered in tacky faux leather...